PacketFabric Column & News
Setting up Kubernetes High Availability Cluster – Building and testing a multiple masters Part I
Author: Kazuhiro Maniwa
Translated by: Francisco Filomena
May 2021
In this blog, I will show you how I built a Kubernetes cluster of three master nodes. I’ll split this into two volumes; the first volume is configuring the systems around core systems including load balancers. The latter one is configuring the Kubernetes cluster itself.
Before that, please note that INAP Japan doesn’t provide Kubernetes related services at the moment…this is purely my self-study.
In writing this blog, I read the two books below. The O’Reilly’s one was terrible since it was full of errata. It made the testing challenging all the more for it, though.
Kubernetes Up and Running – O’Reilly
Mastering Kubernetes Third Edition – Packt Publishing
Other than https://kubernetes.io/docs/, I made great use of the sites below:
https://github.com/kubernetes/kubeadm/blob/master/docs/ha-considerations.md
https://kifarunix.com/configure-highly-available-haproxy-with-keepalived-on-ubuntu-20-04/
https://kifarunix.com/install-and-setup-haproxy-on-ubuntu-20-04/
Goal of this blog
First, to build a high-availability (HA) Kubernetes cluster with three-node master and get it up and running. And then stop one of the masters and confirm that the service won’t get interrupted. In order to focus on building the cluster, I put aside Pod scaling out, rolling updates and so on.
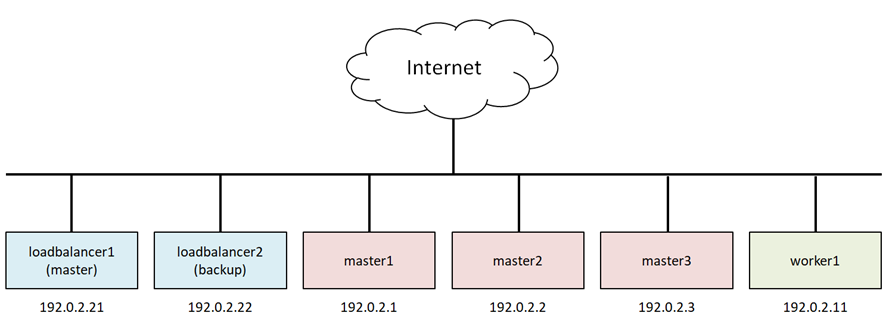
Topology
Here is what the test environment looks like.
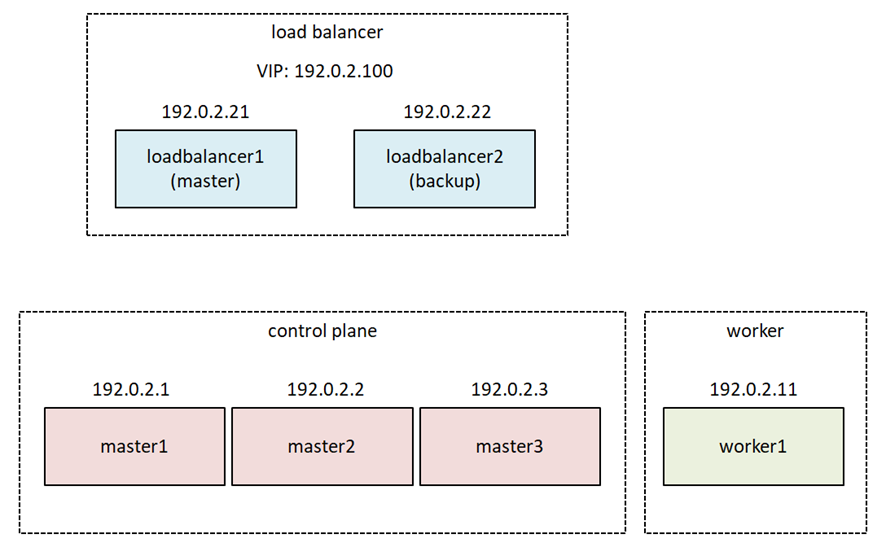
I implemented this Stacked etcd topology(https://kubernetes.io/docs/setup/production-environment/tools/kubeadm/ha-topology/)on INAP Cloud, which is an OpenStack-base. Again, I made the virtual network topology the simplest flat network for simplicity. If I want to build and test a complicated virtual network, I will write another blog. The IP addresses here are all masked. They are originally the global IP addresses allocated to INAP.
The number of master nodes should be an odd number since the etcd database uses the Raft consensus algorithm. If the number of master is three, up to one master failure can be tolerated, if it is five, up to two failures can be tolerated, and so on.
As for the worker node, one is OK for this test. I don’t want it to be unreasonably complicated.
Furthermore
In this blog I login as root. I don’t want to make my explanation messy with sudo stuff. You won’t see any apt update or apt upgrade -y and stuff, but these basic operations have been completed before hand.
However, I had to devote a lot of space to topics such as load balancers and firewalld, which are not seemingly related to Kubernetes. They are deeply related to the behavior of Kubernetes clusters, therefore are unavoidable.
“…” means omission.
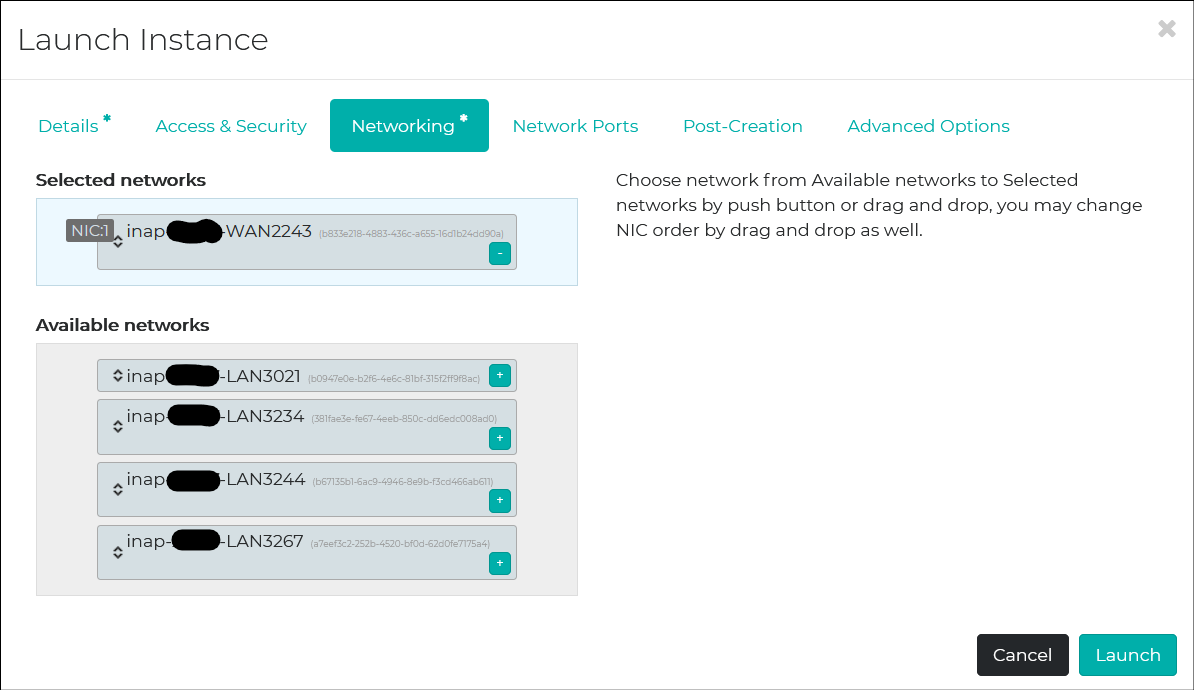
Launching Instances
The OS used in this blog is Ubuntu Linux 20.04, the latest version at the time of writing.
Control-Plane Node
These are the leading part of the Kubernetes cluster. The below flavor would suffice. Spin up three instances with the same spec.

Some VLANs are allocated to my account, but only WAN2243 is used. This is the internet-facing network.
Worker Node
A little richer than master nodes. 16 vCPU/64GB memory would be enough.

Load Balancer
Keepalived and HAProxy won’t require many resources. This will suffice.

Failover IP
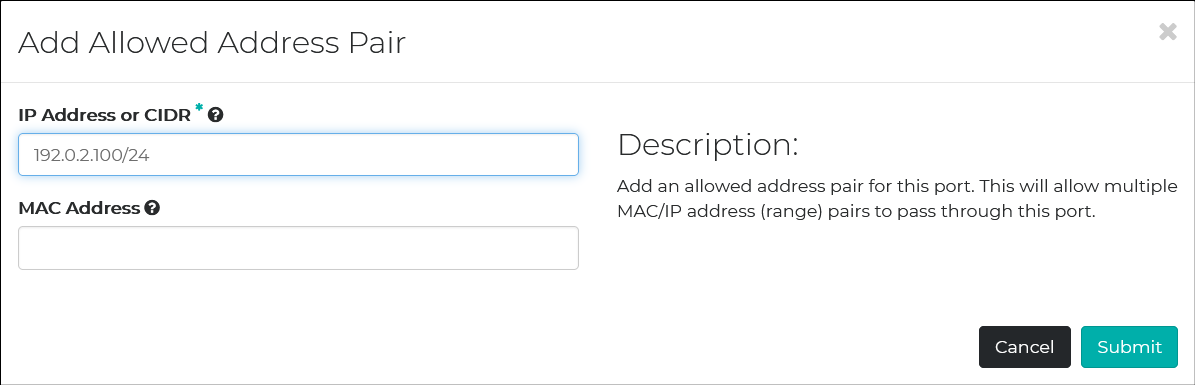
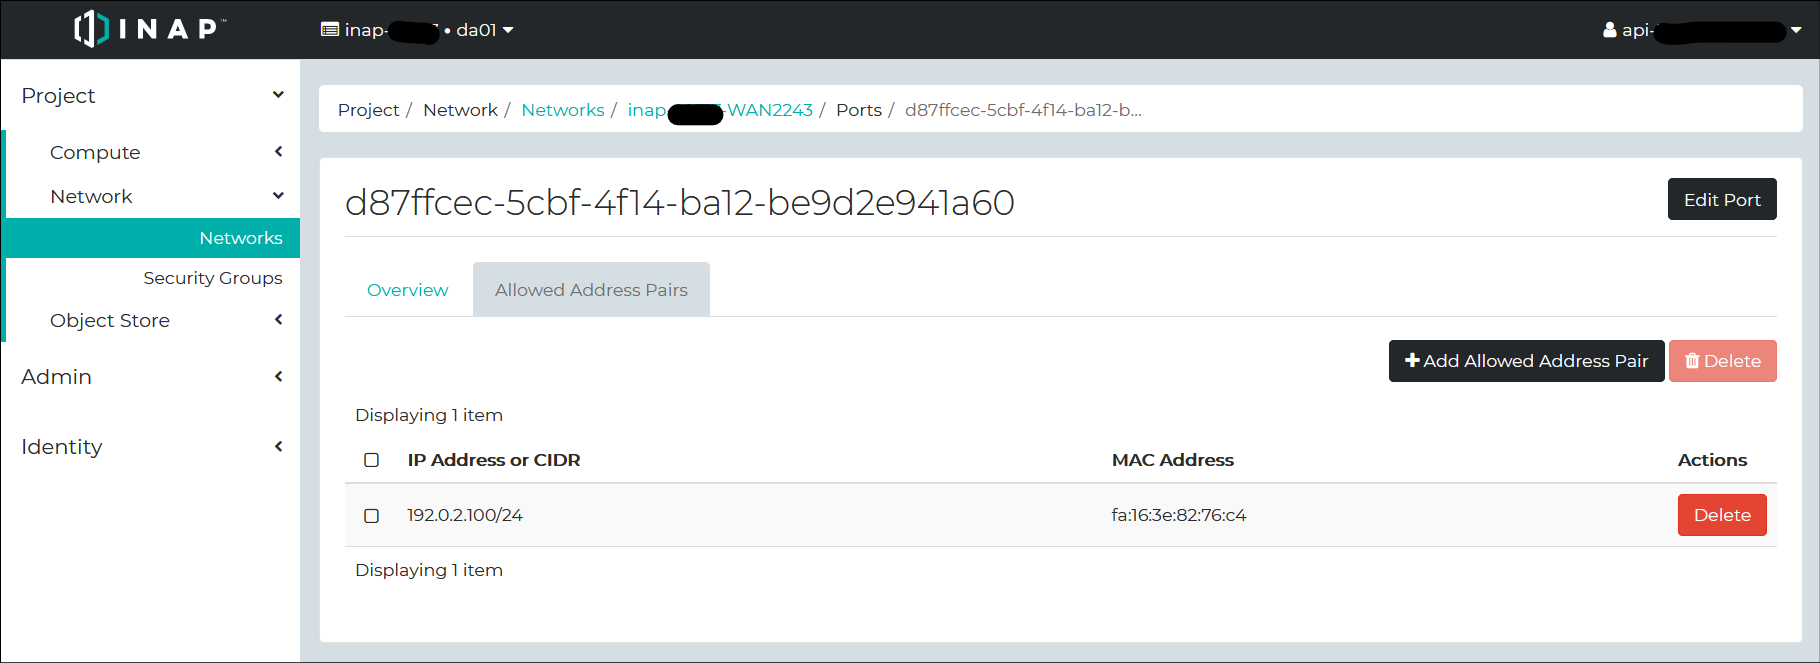
One thing related to OpenStack – I used the virtual IP address of the load balancer: 192.0.2.100/24. The Floating IP address of OpenStack is assigned to an instance. However, this virtual IP address (also known as failover IP address) moves from instance to instance. It won’t be assigned to a specific instance. In this case, in order for the failover IP address to be accessible from outside, allowed-address-pairs should be configured. You can do that on Horizon Dashboard.
Allowed-address-pairs is configured to ports. By drilling down the floating IP addresses assigned to the load balancers, you can get to the configuration panel of Allowed-address-pairs.
We have two load balancers, so I assigned the failover IP address of 192.0.2.100/24 to the allowed-address-pairs on each physical IP address of the load balancers. By the way, this failover IP address is one of the unused IP addresses of the network prefix.
That’s it for the work on OpenStack. Let’s SSH to the instances.
Building Load Balancer
I installed Keepalived and HAProxy on the load balancer nodes. I also installed Firewalld since I am not familiar with UFW which is the default firewall software for Ubuntu. The configurations of two nodes are identical except for the keepalived.conf.
Firewalld
Installing Firewalld and configuring it to start automatically on boot.
# ufw disable
# apt install firewalld
# systemctl enable firewalld
# systemctl start firewalld
# firewall-cmd --state
running
Here is the version of Firewalld.
# firewall-cmd --version
0.8.2
Allow the VRRP traffic of Keepalived. Without this rule, the load balancers cannot acknowledge the HA status of each other, resulting in a situation where the VIP becomes active on both servers.
Firewalld doesn’t come with a pre-defined service of VRRP, so I added the rule with rich rule.
RFC 3768(VRRP) – Abstract
5.2.2.  Destination Address
   The IP multicast address as assigned by the IANA for VRRP is:
      224.0.0.18

5.2.4.  Protocol
   The IP protocol number assigned by the IANA for VRRP is 112
   (decimal).
Here is the command line. Other than this, you can JUMP directly into iptables.
# firewall-cmd \
--zone=public \
--add-rich-rule='rule family="ipv4" destination address="224.0.0.18" protocol value="112" accept' \
--permanent
# firewall-cmd --reload
# firewall-cmd --zone=public --list-rich-rules
rule family="ipv4" destination address="224.0.0.18" protocol value="112" accept
Allowing the port 6643 – Kubernetes API server.
# firewall-cmd --zone=public --add-port=6443/tcp --permanent
# firewall-cmd --reload
# firewall-cmd --zone=public --list-ports
6443/tcp
Keepalived
Installing the package. The version is 2.0.19.
# apt install keepalived
# keepalived --version
Keepalived v2.0.19 (10/19,2019)
In order for Keepalived (and HAProxy) to balance traffic, a virtual IP (VIP, also known as failover IP) address is required. This VIP needs to be bound to a non-local socket, which can be done by setting the kernel parameter below.
# echo "net.ipv4.ip_nonlocal_bind = 1" >> /etc/sysctl.d/99-sysctl.conf
# shutdown -r now

# sysctl net.ipv4.ip_nonlocal_bind
net.ipv4.ip_nonlocal_bind = 1
keepalived.conf
This is the /etc/keepalived/keepalived.conf on the master server.
global_defs {
    router_id INAP_LVS
}

vrrp_script check_haproxy {
  script "/etc/keepalived/check_haproxy.sh"
  interval 3
  weight -2
  fall 10
  rise 2
}

vrrp_instance VI_1 {
    state MASTER
    interface ens3
    virtual_router_id 51
    priority 101
    authentication {
        auth_type PASS
        auth_pass P@ssw0rd
    }
    virtual_ipaddress {
        192.0.2.100/24
    }
    track_script {
        check_haproxy
    }
}
This is the keepalived.conf of the backup server. The values in red are different from the master’s.
global_defs {
    router_id INAP_LVS
}

vrrp_script check_haproxy {
  script "/etc/keepalived/check_haproxy.sh"
  interval 3
  weight -2
  fall 10
  rise 2
}

vrrp_instance VI_1 {
    state BACKUP
    interface ens3
    virtual_router_id 51
    priority 100
    authentication {
        auth_type PASS
        auth_pass P@ssw0rd
    }
    virtual_ipaddress {
        192.0.2.100/24
    }
    track_script {
        check_haproxy
    }
}
Here are some special notes on them.
vrrp_script {} block
So what is deemed a failure that causes the backup side to failover to Keepalived?
As shown in the “/etc/keepalived/check_haproxy.sh” script, the failover should happen when the HAProxy function, i.e. the load balancing function, is judged to be dead.
The monitoring script is as follows:
/etc/keepalived/check_haproxy.sh
#!/bin/sh

VIP=192.0.2.100

if ! nc -z -w 3 localhost 6443
  then
  echo "Port 6443 is not available." 1>&2
  exit 1
fi

if ip address show secondary | grep -q $VIP
  then
  if ! curl --silent --max-time 2 --insecure https://$VIP:6443/ -o /dev/null
    then
    echo "https://$VIP:6443/ is not available." 1>&2
    exit 1
  fi
fi
To start, unless the listening port 6443 is free, there won’t be any load balancing or anything happening. To check this, just run the nc command in port scan mode (-z).
Let’s get it to give up after 3 seconds (-w 3 ) since we can’t be waiting around to see if the port is available. If the nc command fails, let’s get it to deliver the bad news (Port 6443 is not available.) and ask it to exit 1. This will trigger our lad Keepalived to begin the failover.
if ! nc -z -w 3 localhost 6443
  then
  echo "Port 6443 is not available." 1>&2
  exit 1
fi
By the way, “Port 6443 is not available.” won’t appear in the journalctl log even if it is redirected to error output. I wonder where that “bad news” is getting disposed of… Well, it has nothing to do with HA testing, so I’ll make it my homework for later.
journalctl output
Feb 28 08:49:38 loadbalancer1 Keepalived_vrrp[40333]: Script `check_haproxy` now returning 1
If port 6443 is open, let’s check that all-important load balancing function. Using curl on the virtual IP and port 6443 will get you redirected to one of the three Kubernetes api-servers. If there’s a response due to that, good. If there’s no response, the load balancing function is dead, and should trigger the failover as expected.

How do I know if Keepalived is currently MASTER or BACKUP? You can’t find this out with one command. One of the Keepalived features is the notify script. If you make the notify script run in the vrrp_instance{} block of keepalived.conf, MASTER/BACKUP will be returned in the third parameter. However, this is the first time that MASTER/BACKUP is returned since the state transitioned, so the state is unknown until the first failover after Keepalived is started. So, I decided to determine MASTER/BACKUP by checking if a virtual IP is assigned as a secondary IP address in the assigned IP address.
if ip address show secondary | grep -q $VIP
  then
  if ! curl --silent --max-time 2 --insecure https://$VIP:6443/ -o /dev/null
    then
    echo "https://$VIP:6443/ is not available." 1>&2
    exit 1
  fi
fi
If you are the MASTER, then run curl on the Kubernetes API-Server, and if there is no return code, it will exit 1 and failover. FYI, the https://192.0.2.100:6443/ return code is as below – Forbidden 403. The return can be anything; all you need is a HTTPS response.
# curl --insecure https://192.0.2.100:6443/
{
  "kind": "Status",
  "apiVersion": "v1",
  "metadata": {

  },
  "status": "Failure",
  "message": "forbidden: User \"system:anonymous\" cannot get path \"/\"",
  "reason": "Forbidden",
  "details": {

  },
  "code": 403
Run check_haproxy.sh every 3 seconds, and if the return value is 1, reduce your confidence level by 2 (priority 101 – 2 = 99) and the other side will go from the BACKUP to the MASTER (priority 100)
vrrp_instance {} block
Some things that deserve a special mention here are priority and the specified point of the virtual IP.
virtual_ipaddress {
        192.0.2.100/24
}
The previously mentioned check_haproxy script is also specified here.
track_script {
        check_haproxy
}
Once the keepalived.conf for both machines is completed, start the keepalived service.
# systemctl enable Keepalived
# systemctl start Keepalived
# systemctl status Keepalived
The check_haproxy script is failing because the Kubernetes api-server has not been built yet, but that can be ignored. The keepalived service reads keepalived.conf and checks that the service start-up is successful.
HAProxy
At the time of writing, the HAProxy package for Ubuntu 20.04 was the 2.0.x series, but if you use the repository managed by Vincent Bernat (https://launchpad.net/~vbernat) you can get the 2.3.x series.
# apt install software-properties-common
# add-apt-repository ppa:vbernat/haproxy-2.3
# apt update
# apt install haproxy
# haproxy -v
HA-Proxy version 2.3.5-1ppa1~focal 2021/02/06 - https://haproxy.org/
Status: stable branch - will stop receiving fixes around Q1 2022.
haproxy.cfg
Create the config file /etc/haproxy/haproxy.cfg. Both machines have the same configuration.
global
        log /dev/log    local0
        log /dev/log    local1 notice
        user haproxy
        group haproxy
        daemon

defaults
    mode                    http
    log                     global
    option                  httplog
    option                  dontlognull
    option http-server-close
    option forwardfor       except 127.0.0.0/8
    option                  redispatch
    retries                 1
    timeout http-request    10s
    timeout queue           20s
    timeout connect         5s
    timeout client          20s
    timeout server          20s
    timeout http-keep-alive 10s
    timeout check           10s

frontend apiserver
    bind *:6443
    mode tcp
    option tcplog
    default_backend apiserver

backend apiserver
    option httpchk GET /healthz
    http-check expect status 200
    mode tcp
    option ssl-hello-chk
    balance roundrobin
      server api-server1 192.0.2.1:6443 check
      server api-server2 192.0.2.2:6443 check
      server api-server3 192.0.2.3:6443 check
global section
The user who starts as a daemon and starts the service is haproxy. The account for the service is created as follows:
# useradd --system --no-create-home --shell=/sbin/nologin node
# id haproxy
uid=109(haproxy) gid=115(haproxy) groups=115(haproxy)
defaults section
Defines the default behavior. The default operation mode is “http”, but the one that’s actually used is TCP mode.
frontend section
It listens on port 6443 to all interfaces (although having said that, it’s only ens3 and lo ).
bind *:6443
Now, rewrite the default http in tcp mode and designate a “apiserver” in the backend. The load will be distributed to the server specified by this apiserver.
mode tcp
…
default_backend apiserver
backend section
Here, I will explain the details of the apiserver specified on the frontend.
First I will describe the server settings.
Specify the real Kubernetes API server’s IP address:port number on the server.
The requests received on the frontend section’s bind *:6443 are load balanced to these three IP address:ports, as shown in the balance roundrobin below.
balance roundrobin
   server api-server1 192.0.2.1:6443 check
   server api-server2 192.0.2.2:6443 check
   server api-server3 192.0.2.3:6443 check
The reason for the “check” on the end is for monitoring the status. This is different to the load balancing of production traffic on port 6443 that I just mentioned. What is checked here is defined in the section a little above this one.
option httpchk GET /healthz
http-check expect status 200
In short, access https://:6443/healthz, and if code 200 is returned then we can say there’s no problem. When I actually run curl, the following is returned:
# curl --insecure https://192.0.2.1:6443/healthz
ok
# curl --verbose --insecure https://192.0.2.1:6443/healthz
…
< HTTP/2 200
…
If code 200 is not returned with /healthz, then the server in question is considered to have stopped and it is removed from the load balancing.
Mar 01 06:44:45 loadbalancer1 haproxy[184256]: [WARNING] 059/064445 (184256) : Server apiserver/api-server1 is DOWN, reason: Layer4 connection problem,(省略)
The number of seconds before removal from load balancing and the number of seconds to rejoin load balancing after recovery is set in the defaults section’s timeout parameter.
Once the haproxy.cfg configuration file is complete, restart the haproxy service.
# systemctl restart haproxy
# systemctl status haproxy
# journalctl -xeu haproxy
The Kubernetes API server has not been built yet so you will get status monitoring logs, but these can be ignored. The haproxy service will check that haproxy.cfg has been successfully read and that the service itself is running.
Following these steps, we have prepared the load balancer needed for the Kubernetes HA cluster. In the second part of this blog, we will move forward with creating the main part – the Kubernetes cluster.
- Call us
- +81-3-5209-2222
